- Initialize a payment.
- Redirect to the checkout URL to complete the payment.
- Securely verify the transaction.
Prerequisites
To integrate the Spotflow Initialize Payment API endpoint, you must have the following:- A Spotflow merchant account that is KYB Verified and Configured. You can sign up for an account here.
- Get your API Credentials(API Keys) i.e your test secret key or live secret key from your Spotflow dashboard. This will be used to authenticate your request.
Step-by-step Process on How to Integrate Spotflow Initialize Payment API
To make this tutorial practical, we will build a simple event ticket app. Although this may differ from the app you want to build, the process is usually the same. This way, you can understand how the integration works and easily add the API to your application.Before we start, make sure you have:
- A Spotflow merchant account
- Basic familiarity with Python/Django
Step 1: Retrieve your customers basic information
Retrieve the basic customer information you need to process their transactions. E.g., name, email address, amount, etc. You can retrieve customer information from your database or from an HTML form, just like the one in the example below.Step 2: Temporarily store the retrieved data if you are using the HTML form method
Step 3: Get your test secret key or Live secret key.
You can use the test secret key when testing the API, and the live key when you are ready to go live.
Step 4: Set the authorization header.
Step 5: Get your callBackUrl.
This represents the specific URL you want to redirect customers to immediately after the checkout process.
You can set this on your Spotflow dashboard in Settings —> Payments —> API Keys —> Webhooks & CallBack —> CallBack URL.
Step 6: Retrieve all the information you need to send a request to the initalize API in your checkout function.
Information like username, amount, and email is compulsory.
The
reference in the example above generates a universally unique identifier, but must be replaced by a unique ID from your system to make payments easy to track.Step 7: Pass in the retrieved details as body parameters.
Step 8: Set the initialize payment endpoint and pass in the body parameters.
Step 9: Retrieve the API response.
If it is successful, convert it to JSON; else, display an error message if the request failed.-
reference: represents the unique reference ID. -
checkoutUrl: represents the checkout URL you will redirect the user to complete their payment. -
status: represents the transaction status. -
callBackUrl: represents your callback URL. -
metadata: represents your product metadata. -
title: represents your product title. -
productName: represents your product name.
Step 10: Retrieve reference and checkoutUrl from the response.
These are the two important keys you need.
Step 11: Redirect the user to the checkoutUrl to complete the checkout process.
This is where users will securely make payments using the Spotflow secure payment gateway.
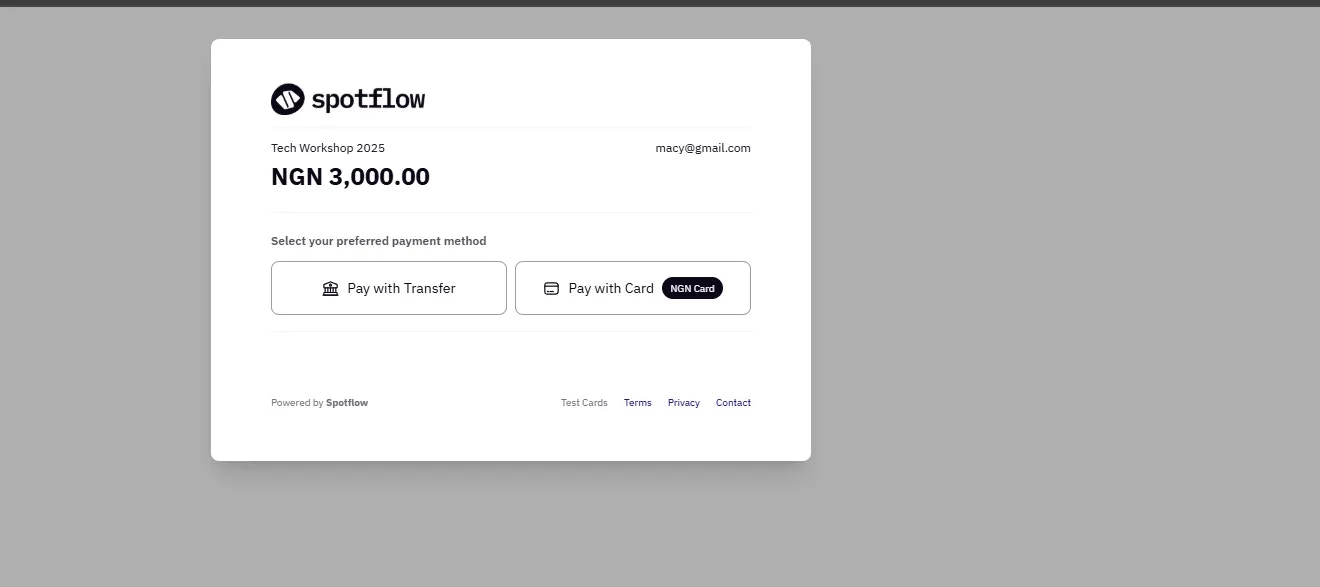
Initialize API and then redirects to the checkoutUrl to make payments.
You should have something like this:

To pay with a card, you can use Spotflow’s test cards in test mode and then a real card in live mode.
Step 12: Once the payment is complete, it will automatically redirect them to the callBackUrl you specified earlier.
Important Notes:
- You, as the merchant that owns the application and the user who made the payment, will receive the payment receipt in your email once the payment is successful.
- If you don’t specify the
callbackUrl, the user will not be redirected to your site after payments.
How to Securely Verify a Transaction Status
Once the user completes payment, you need to verify the transaction status to prevent fraud. There are two ways to verify a transaction status. You can either use theverify payment API or the webhooks.
However, the webhook method is often preferred because it provides real-time updates and is more efficient than calling the verify payment API repeatedly to check transaction status.
How to Verify Transaction Status Using Webhooks
Webhooks are event-triggered messages that automatically update you whenever a payment status changes. For instance, when a customer makes a payment and the transaction is successful/failed, that is an event. Spotflow instantly sends a POST request to the webhook URL you set. This request provides information about the event, such as the reference, amount, etc. Then you can retrieve the data and determine how you want to update your user on the status of their transaction or the next steps. There are two main steps involved when using the webhook methods.Step 1: Create a webhook URL
You can instantly create a webhook URL on sites likewebhook.site when testing and then create a new URL (specific endpoint) in your backend when you want to go live.
Step 2: Register your webhook URL in the Spotflow dashboard.
- Log in to your Spotflow Dashboard.
- Navigate to the “Settings” section and click the “Payments” tab.
- Click the “API Keys” option and scroll down to the “Webhook” section.
- Enter your webhook URL in the box and click the save/update button.
If you are using a unique webhook URL from webhook testing tools like webhook.site, paste it here directly.
If you configured it in your backend, paste the deployed URL here.
- Enter the OTP from your authenticator app to complete the process.
How to Verify Transaction Status Using the Verify Payment API
The SpotflowVerify Payment API allows you to verify transaction status using your set unique reference ID at payment creation.
Here is how the verification process typically works.
Step 1: Retrieve the unique reference ID in the initialize payment API response.
Step 2: Get your API keys and set your headers.
Step 3: Pass the reference ID as a path parameter to the verify payment endpoint.
Step 4: Send your API request.
Step 5: Retrieve the specific data you need in the API response.
Step 6: Display the necessary details you want users to see in the verification page.
Something like this:
Troubleshooting
Common issues and their solutions:Checkout creation failing
Checkout creation failing
Possible causes:
- Invalid/missing fields.
- Region and Service providers not configured.
- Network connectivity issues.
- Verify that you added all the necessary/required fields.
- Verify from our support team that you’ve been region and service provider configured as a merchant. By default, this is not set.
- Test API connectivity with a simple GET request
Congratulations! You’ve Implemented the Initialize/Redirect API
You’ve successfully integrated the Redirect checkout with Spotflow! Here’s what you accomplished:Secure Payment Processing
Your application can now accept payments securely through Spotflow
Payment Initialization
You can create payment sessions and generate unique checkout URLs for your customers
Smooth Checkout Experience
Your users are automatically redirected to Spotflow’s secure checkout page to complete payments
Transaction Verification & Professional Payment Flow
You’ve implemented either webhook or API-based verification to confirm payment status & prevent fraud with a complete end-to-end payment workflow from initialization to verification
This example demonstrates only a minimal implementation of the Initialize/Redirect API. For production use, you should add robust error handling, authentication, data validation, security measures, and adapt the logic to fit your application’s requirements.
What’s Next?
Now that you have the basics working, you can:- Go Live: Switch from test mode to live mode using your live secret key and start accepting real payments.
- Customize Metadata: Add more product information and custom fields to track your business-specific data
- Monitor Transactions: Use your Spotflow dashboard to track payments collections and manage your business
- Explore More Features: Check out our other APIs for subscriptions, disbursements, and more
Contributed by Gloria Tejuosho during Hacktoberfest ‘25 with Spotflow

